
Discord has become an essential tool for gamers worldwide, offering seamless communication through voice, video, and text. Whether you’re coordinating with teammates or building a community, knowing how to set up a server is a valuable skill. This guide, , walks you through every step of the process, from creating your server to customizing channels and managing permissions. Designed with gamers in mind, it provides clear, practical tips to enhance your experience. Discover how to build a thriving gaming community, streamline communication, and maximize your gameplay with this comprehensive resource for both beginners and experienced users.
How to Create and Customize Your First Discord Server for Gaming
Creating a Discord server is the first step to building a community around your favorite games. Whether you’re teaming up with friends for co-op campaigns or organizing a competitive multiplayer league, knowing how to set up a server efficiently is crucial. This guide, Discord: The Ultimate Guide for Gamers (How to Set Up a Server), walks you through the essential steps to launch a fully functional gaming server. From initial setup to advanced customization, you’ll learn the tools and best practices to enhance communication, streamline gameplay coordination, and foster a vibrant gaming environment.
Understanding the Basics of Discord Server Creation
Starting a Discord server begins with launching the Discord app or accessing the web version, clicking the + icon on the left-hand server panel, and selecting Create a Server. You’ll be prompted to name your server—choose something relevant to your gaming focus, like Apex Legends Squad or Minecraft Builders Guild. Then, select a region closest to your team’s physical location to reduce latency. Once created, you’ll land in the default General text channel. It’s important to understand that every server operates on a hub of text channels, voice channels, and roles, which help organize communication. This foundational knowledge is a core element of Discord: The Ultimate Guide for Gamers (How to Set Up a Server).
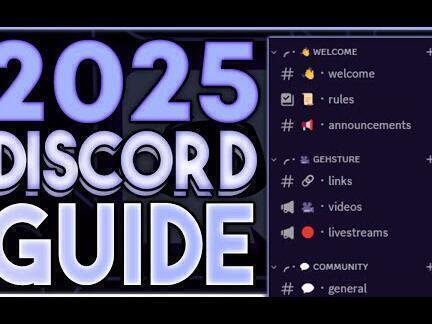
Setting Up Voice and Text Channels for Optimal Gaming Communication
Efficient in-game communication relies on well-structured channels. Start by creating dedicated voice channels such as In-Game Voice, Strategy Room, or AFK Lounge under different categories like Voice Chat or Tactical Planning. For text-based coordination, set up channels like game-schedule, clips-and-highlights, and server-rules. Use clear naming conventions and descriptions so members know where to go. You can categorize channels by purpose—e.g., Game Night Coordination or General Chat—to keep discussions organized. This level of structure ensures that your server remains professional and functional, a critical aspect emphasized in Discord: The Ultimate Guide for Gamers (How to Set Up a Server).
Configuring Roles and Permissions for Team Management
Roles are essential for managing user access and responsibilities within your server. Navigate to Server Settings > Roles to create custom roles such as Admin, Moderator, Veteran Player, and New Member. Assign color codes and permissions accordingly—for instance, only admins should be able to delete channels or ban users. Lower-tier roles may only have permission to send messages in specific channels or connect to voice chats. Proper permission settings prevent chaos and abuse, helping maintain order during intense gaming sessions. Utilizing role-based access control is a pivotal topic covered in Discord: The Ultimate Guide for Gamers (How to Set Up a Server).
Inviting Friends and Growing Your Gaming Community
With your server structure in place, it’s time to grow your community. Click the Invite People button or go to the Invite tab under a voice or text channel to generate a shareable link. Set expiration dates or usage limits for security. Share the invite in social media groups, gaming forums, or directly with friends. Consider using Discord’s Welcome Screen feature to display important channels and rules when new members join. To encourage engagement, assign automatic roles using bots like Dyno or MEE6. This step ensures a smooth onboarding process, a strategy thoroughly detailed in Discord: The Ultimate Guide for Gamers (How to Set Up a Server).
Enhancing Server Experience with Bots and Integrations
Bots can significantly improve server functionality. Popular bots like MEE6, Tatsumaki, and Rythm allow for moderation, user leveling, music playback, and game notifications. To add a bot, visit platforms like top.gg, authorize the bot with your server, and assign it appropriate permissions. For example, MEE6 can greet new users, enforce rules, and track activity. Music bots are perfect for pre-game hype playlists. Additionally, integrate Twitch or YouTube to notify members when a streamer goes live. These tools empower your server with automation and interactivity, a major focus in Discord: The Ultimate Guide for Gamers (How to Set Up a Server).
| Feature | Purpose | Best Practices |
| Voice Channels | Enable real-time communication during gameplay | Create multiple channels by game or activity type |
| Text Channels | Facilitate planning, updates, and casual chat | Use clear naming and category organization |
| Custom Roles | Manage permissions and user hierarchy | Assign limited permissions to avoid abuse |
| Invite Links | Allow others to join the server securely | Set expiration and usage limits |
| Discord Bots | Automate moderation and enhance user experience | Choose trusted bots and review permissions |
Frequently Asked Questions
How do I create a Discord server for gaming?
To create a Discord server tailored for gaming, log into your Discord account, click the + icon on the left sidebar, and select Create a Server. Choose a name that reflects your gaming community, select a region for optimal server location, and click Create. You can then customize channels for voice, text, and categories to organize discussions around specific games or topics.
What are the best practices for setting up voice channels in a gaming server?
When setting up voice channels for gaming, create dedicated channels for each game or activity—such as Valorant Voice or General Chat—and set appropriate user permissions to control access. Enable features like voice activity detection and adjust bitrate for clear communication. Limit member counts if necessary to reduce noise and maintain focus during gameplay.
How can I invite friends to join my gaming server?
To invite friends, navigate to your server, click the Invite button, and generate a new invite link. You can set expiration times and usage limits for security. Share the link via messaging apps, social media, or email. Alternatively, right-click the server name and select Copy Invite Link for quick sharing.
What roles and permissions should I set for a gaming community?
Define roles such as Admin, Moderator, and Member to manage responsibilities and control access. Assign permissions carefully—Admins should have full control, Moderators can manage messages and users, and Members have basic chat and voice access. Use role hierarchies to prevent conflicts and ensure smooth server management.
